Showing posts with label upcycle. Show all posts
Wednesday, August 9, 2017
Re-Loved French Provincial Dresser
Hello dear friends! I am back to share something special with you today and I hope that you love it as much as I do. Let's go back to February 2016, when I found the most beautiful French Provincial style lowboy dresser. I had been searching high and low for an unusual piece and found just what I had in mind on Craigslist for a really good price. The only wrinkle was that it was located in Vancouver B.C., Canada. The look on my husband's face when I informed him that we were driving three hours to the north to fetch this beauty was priceless. We hopped into our Durango (rest in peace, I miss your large cargo space) and off we went. I loved that it was located in the New Westminster neighborhood of Vancouver which is chock full of lovely vintage houses from the 1890's to the turn of the century. I really wished we had had more time to explore, but we were on a time crunch that day. I adored the piece which I was intending to use as a credenza/buffet, threw it in the garage and it sat there for almost six months before I finally found my inspiration. Sometimes, all it takes is a single random photo or perhaps a far away friend who's a composer by trade to inspire a big idea. While searching online for paint colors for the front door at our old house, I stumbled across the photo below and instantly fell in love with the grungy undertones that are Paris. It has inspired a whole suite of furniture for my home and I thought I would share the products I use and the process today as I added a matching new piece a weekend ago that I'm pretty excited about.
I found this piece on the app OfferUp. I like this app as I've been able to find some pretty good bargains. As with most of my shopping habits, I prefer doing things online. Garage sales are fun, but I have a crazy schedule with kids and a job in healthcare, so I prefer scrolling through inventory while on a break or commuting. When I found I saw this dresser, I just had to have it as it's an exact match for the piece I already have, just in a smaller size, and I had the perfect place to put it. Our new house is quite a bit smaller than our old one and we no longer have a formal dining room. What was my credenza/buffet has become a television stand and I've missed having a place to display some of my favorite ironstone pieces. She was in pretty good shape, and I immediately set to work by wiping her completely down (inside and out) with a mixture of white vinegar and hot water. This helps to get rid of any stains or odors that might be lingering, and I like that it's chemical free. Once it was dry, I sanded down any flea bites or minor blemishes. Luckily, this piece didn't really have many issues, so it took all of two seconds and I wiped the dust away with a dry cloth. I taped off the top and started in with my chalk paint.
I really dislike when bloggers don't list their products. Unfortunately, I will have to be one of those annoying people as I picked up the original can of paint on the clearance shelf at Lowe's. I have no idea what the color is as it apparently wasn't mixed correctly but it's a lovely vintage dove gray. I was using Christy's recipe (link at the bottom) to make my own chalk paint but I decided to try out Valspar's Chalk Paint on this piece. I hadn't realized that Valspar had a chalk paint in their range of paint products until I randomly stumbled across it while browsing at my local Lowe's. It comes in 40 different colors, B-U-T you can literally have any color from any brand mixed so long as you have the paint code available (mine is in the photo below). Ah-mazing! It typically takes about three coats to cover up the beige laminate body of these pieces. The Valspar brand dried pretty quickly and I was able to get my three coats applied on a Saturday evening before the sun went down.
I let my chalk paint settle overnight and started on the top the next morning. I LOVE, LOVE, LOVE General Finishes Java Gel Stain for the tops of my furniture. Most of all the pieces I've refinished have this deep, dark luscious stain on the top which is my homage to the dark top of a Parisian building. I get so many compliments (and questions) whenever I feature or sell a piece online and it is so simple to use. I start out with a cheap foam brush in the medium size to apply the stain on a thick layer. Once the top is completely coated, I take a small paint roller and roll out the product on the top. This allows for a super smooth and flawless finish. Again, it usually takes about three coats to get an opaque coat, the photo below was taken after the application of a second coat. When I'm done with a coat, I just slip my foam brush into a sandwich baggie and put saran wrap around my roller between coats and re-use them because paint supplies can add up quickly.
While the last coat of stain is drying, I go ahead and apply my wax over the chalk paint to seal it in and protect the piece. To give it that vintage Parisian feel, I used a mixture of dark and clear waxes from the Valspar Chalk Paint line mixed together and applied with a small chalk paint brush. It looks pretty scary and streaky when first applied, but I take a rag or towel and rub it in which helps to diffuse and soften the dark wax leaving a warm glaze effect over the paint. It gives it an amazing "antiqued" look without having to distress the piece. I let the stain and wax dry overnight and apply my favorite top coat over the Java Gel Stain. I really enjoy General Finishes High Performance Top Coat. It adds a really nice shiny gloss to the dark espresso top. I always get the QTHS Satin version as it gives the prettiest finish in my opinion. Again, about three maybe four coats to really seal that stain in and protect your handiwork. I apply it the same way as I do the stain, and save my foam brush and roller between applications.
Now for the fun part! I have long been obsessed with Modern Masters Metallic paints and the shade Oyster is a match made in heaven for these furniture pieces. The metallic effect really elevates the piece and makes is so much more elegant! To start, I give the hardware a couple coats of some type of white paint as a base. I'm currently using white chalk paint from Rustoleum that I don't really like. It's great for using as a base paint though and this way I'm not wasting it. Once my hardware has the base, I go ahead and paint a couple of coats with the Oyster shade. This is a super light and very sheer paint to work with. It dries quickly though so it doesn't take long to build up the color. For these particular pieces, I also use this paint on the body of the dresser, along the rounded scallop on the top drawer and flourish at the bottom edge for maximum metallic effect.
Once everything is dry, I put it all together and let it sit for a few days. Chalk paint and wax take about 21 days to fully cure, but I couldn't resist bringing her inside to take photos for you! Isn't she dreamy? I just love the way these pieces turn out! With a wee bit of elbow grease, these tired old pieces from the 1960's & 1970's get a whole new lease on life that can be enjoyed for many years to come. I love that they are so unique and not something that everybody else will have in their home. They are so versatile and can be used in both the bedroom or living room. I've now refinished everything from a coffee table to the buffet now serving as a TV stand to a nightstand that is being used as a couch side table. It doesn't have to cost a fortune to have nice things when you want to redecorate a space in your home. My entire furniture suite in the living room that I refinished cost less than $150 thanks to Craigslist, OfferUp and my local thrift store.
And that is how I refinished my favorite pieces in our new home with my favorite paint/stain combo! I hope that you enjoyed today's post as much as I did sharing it with you. All products I used (paid for with my own money and not sponsored in any way) will be linked below for those interested =)
Chalk Paint Recipe:
Confessions of a Serial DIY'er
Supplies:
Chalk Paint Brush
Sponge Applicators
Paint Roller
Paint Products:
Paint (paint color code is in the photo above)
General Finishes Java Gel Stain
General Finishes High Performance Top Coat
Modern Masters Metallic Paint
Sealing Wax
Antiquing Wax
Small Chalk Paint Brush
Until Next Time,
Frederica
Monday, July 10, 2017
Upcycled Chalkboard
Hello, again! I'm back today with a quick and easy little project that I worked on for my daughter, Miss Olivia at her request. You see, my pretty Olivia will be 17 in September and starting her Junior Year this Fall (How on earth did that happen?). The past two years has been pretty rough on her. Young teenage girls can be so hateful to one another, and Liv has unfortunately felt the effects of that ire more than once from young ladies she considered her friends. She ended her Freshman Year as a kind of pariah and spent her Sophmore Year trying to please others in order not to have a repeat. I have sadly watched my sophisticated and kind young lady turn into someone that I didn't recognize and her life started to fall apart. With the support of our family and her teachers, I did an intervention of sorts. I am hoping that she is now on the path to a healthier and happier future. I have tried to impress upon her that in life, we don't often get a second chance or a clean slate to start over with and not to waste the gift of a bright new year in a new school with the opportunity of making better choices. At the suggestion of my step-mother, she is currently working on making some short/long term goals for the next year and wanted some kind of chalkboard or memo board to write them on. I actually had just the thing to upcycle, and I thought that I would share it with you today!
I found this sad looking and very grimy picture frame at my local thrift store for a whopping $2.99 and threw it into my pile of "stuff to work on" out in the garage. When Liv said she was looking for something cute, I knew it would be perfect for her new room. I pulled it out and gave it a thorough cleaning with a damp cloth and attacked the glass with some windex.
I started on the wood frame first by giving it a couple of coats of a new brand of paint I've discovered - Fusion Mineral Paint in the shade Casement. This is supposed to be a one and done paint, meaning no primer or sealant is needed. I used a random wax brush as I knew that the raised decorative areas in the corners would be a challenge for a normal paint brush and it worked like a dream. I was going to distress it a bit to test it out, but Miss Liv decided that she liked it as is.
Another new to me product is the Krylon chalkboard paint that I picked up while out and about. After the glass was cleaned, I took this outside and applied it as a normal spray paint. Two coats was all it took to get the flat matte black of a chalkboard. I had purchased a special fine tip chalkboard pen and Liv was able to make a list of goals that made my mother's heart sing.
And that's all it takes to upcycle a sad and tired looking piece into something refreshed with a new life! Easy peasy and a pretty inexpensive project that is perfect for a dinner menu or grocery list in the kitchen or as a decorative accent in a girl's room.
Until next time,
Frederica
Thursday, February 23, 2017
The Ugly Ducking Desk
Hello Friends! It's been a while since my last post as it's been a busy time in my little corner of the world. We are getting our house prepped to put on the market within the next few weeks. It seems like once we finish fixing/replacing/touching up, we find yet another little thing that needs attention. I knew that my husband's house was quite roomy at almost 3,000 sq. ft., but it seems endless as I try to remove all the clutter and find temporary homes out of sight for the everyday things that normally live on our counter tops.
I really hate moving, I moved almost ten times as a child (no, we weren't military) cross-country and back again. I just want to put down roots somewhere and call a place home. Luckily, the houses in our neighborhood are literally selling within a matter of days which is really great for us as a seller, but not so great when it comes to planning where our next home will be. With three kids of my own, a stepson and animals, well, I've been a bit stressed out to say the least. My stress reliever the past few years has been puttering around in the garage painting furniture in an effort to fill the empty spaces of my husband's house as it has many. It got too cold for painting here in the Seattle area for the past two months, but it's finally warmed up and I'm back today with a new post on the project that I had to take a wee little break from while the weather wasn't cooperating.
My little guy is five, and I'm afraid to admit that he is still sleeping in the master bedroom with my husband and I. Our older boys each have their own rooms, and Andrew could have easily shared a bedroom with either of them. But. He's still my baby in my eyes and I've been reluctant to move his little bed from the corner of our room that it currently resides in. Realizing that he's now a young boy and in need of his own space, I've been on the hunt to find him some furniture for his very own big boy room for when we finally move.
I found the saddest looking desk on one of my favorite apps called OfferUp for $20. It looked pretty awful, but the bones appeared to be good and I loved the shape of it. I knew with a little bit of love, it could be a darling piece for his room. It's a smaller sized desk. But even still, Andrew has a little bit of growing left to do to be able to use it once he starts school this Fall.
I started by washing the whole thing down with my favorite cleanser, TSP and found a couple of used cigarettes in the bottom drawer (so gross!). Once I opened the drawers, the whole thing started to reek of cigarette smoke. I got every crook and cranny with TSP and then let it air dry out for a few days in my garage trying to eradicate the smell which was a success. The top was riddled with lots of little dents and chips. I decided to sand it down trying to smooth things out a bit, but I actually like for my furniture to have some "character" to it since most of my pieces are vintage. After I sanded down through not one, not two but three layers of ugly paint to the bare wood, I was still left with one or two deep gouges which I did decide to fill with my newest favorite wood filler, Rockler's. It is a liquid-y texture that dries quickly and sands down like a dream.
Sadly, my local retailer for General Finishes products was out of stock of Walnut Gel Stain. I picked up a small can of Miniwax's Walnut Gel Stain and it's an okay product. I still prefer General Finishes stains, but this is a very similar product that's easier to find at your local hardware store. As this desk is intended for a five year old, I went a little thicker on the stain than I normally would with three separate coats letting each one dry in between applications. And that was as far as I got before the weather turned. I had never used General Finishes paint before and I was eager to play with it. It was a sad day when I had to place the can of Coastal Blue back on my shelf with the rest of my paint stash, haha!
In the interim, Andrew and I pored over knobs on Etsy to replace the ugly silver ones that the desk currently sported. Since I was using a gorgeous French/Navy-ish blue, I thought that a bright brassy gold would accent the piece nicely. He chose a super cool vintage inspired lion knob as the focal point. He does have pretty good taste for such a little man, he must get it from his mommy =)
I also found the perfect small chair to match for a whole $8 at the Goodwill. One of the drawers also had a lock with no key to it which I intended to remove. It took a little elbow grease, but I was able to pop it out of the drilled hole and then filled it with more wood filler.
The weather this past weekend finally got warm enough for me to get outside and finish up the base and legs. I didn't use a primer as General Finishes Milk Paint is supposed to be kind of a one and done type of product. I LOVE this paint. It is my new found favorite and I can't wait to add more colors to my stash. It is so smooth, self leveling, it dries quickly and very easy to apply with brush/foam brush/paint roller. Two coats, and it was silky smooth with a beautiful rich blue. This is an excellent product for both newbies and professionals. To seal it all in, I applied several coats of General Finishes Top Coat in Flat Out Flat which was also a new product to me. I've used their Satin Top Coat for most of my products that I've done over the past two years. I didn't want a glossy finish for this piece, but I love that this still has a bit of a subtle sheen.
And here is the finished product! Isn't it cute? It doesn't look anything like the sad little desk that it once was and it's something that my little guy will have for quite a few years to come. I like to imagine him doing his homework, building Legos and hiding his treasures in the drawers.
I hope that you enjoyed my first project of 2017! I am looking forward to getting back into a more regular posting schedule once we move and things calm down a bit.
In the meantime, I hope that all my dear readers are well.
Until next time.
I really hate moving, I moved almost ten times as a child (no, we weren't military) cross-country and back again. I just want to put down roots somewhere and call a place home. Luckily, the houses in our neighborhood are literally selling within a matter of days which is really great for us as a seller, but not so great when it comes to planning where our next home will be. With three kids of my own, a stepson and animals, well, I've been a bit stressed out to say the least. My stress reliever the past few years has been puttering around in the garage painting furniture in an effort to fill the empty spaces of my husband's house as it has many. It got too cold for painting here in the Seattle area for the past two months, but it's finally warmed up and I'm back today with a new post on the project that I had to take a wee little break from while the weather wasn't cooperating.
My little guy is five, and I'm afraid to admit that he is still sleeping in the master bedroom with my husband and I. Our older boys each have their own rooms, and Andrew could have easily shared a bedroom with either of them. But. He's still my baby in my eyes and I've been reluctant to move his little bed from the corner of our room that it currently resides in. Realizing that he's now a young boy and in need of his own space, I've been on the hunt to find him some furniture for his very own big boy room for when we finally move.
I found the saddest looking desk on one of my favorite apps called OfferUp for $20. It looked pretty awful, but the bones appeared to be good and I loved the shape of it. I knew with a little bit of love, it could be a darling piece for his room. It's a smaller sized desk. But even still, Andrew has a little bit of growing left to do to be able to use it once he starts school this Fall.
I started by washing the whole thing down with my favorite cleanser, TSP and found a couple of used cigarettes in the bottom drawer (so gross!). Once I opened the drawers, the whole thing started to reek of cigarette smoke. I got every crook and cranny with TSP and then let it air dry out for a few days in my garage trying to eradicate the smell which was a success. The top was riddled with lots of little dents and chips. I decided to sand it down trying to smooth things out a bit, but I actually like for my furniture to have some "character" to it since most of my pieces are vintage. After I sanded down through not one, not two but three layers of ugly paint to the bare wood, I was still left with one or two deep gouges which I did decide to fill with my newest favorite wood filler, Rockler's. It is a liquid-y texture that dries quickly and sands down like a dream.
Sadly, my local retailer for General Finishes products was out of stock of Walnut Gel Stain. I picked up a small can of Miniwax's Walnut Gel Stain and it's an okay product. I still prefer General Finishes stains, but this is a very similar product that's easier to find at your local hardware store. As this desk is intended for a five year old, I went a little thicker on the stain than I normally would with three separate coats letting each one dry in between applications. And that was as far as I got before the weather turned. I had never used General Finishes paint before and I was eager to play with it. It was a sad day when I had to place the can of Coastal Blue back on my shelf with the rest of my paint stash, haha!
In the interim, Andrew and I pored over knobs on Etsy to replace the ugly silver ones that the desk currently sported. Since I was using a gorgeous French/Navy-ish blue, I thought that a bright brassy gold would accent the piece nicely. He chose a super cool vintage inspired lion knob as the focal point. He does have pretty good taste for such a little man, he must get it from his mommy =)
I also found the perfect small chair to match for a whole $8 at the Goodwill. One of the drawers also had a lock with no key to it which I intended to remove. It took a little elbow grease, but I was able to pop it out of the drilled hole and then filled it with more wood filler.
The weather this past weekend finally got warm enough for me to get outside and finish up the base and legs. I didn't use a primer as General Finishes Milk Paint is supposed to be kind of a one and done type of product. I LOVE this paint. It is my new found favorite and I can't wait to add more colors to my stash. It is so smooth, self leveling, it dries quickly and very easy to apply with brush/foam brush/paint roller. Two coats, and it was silky smooth with a beautiful rich blue. This is an excellent product for both newbies and professionals. To seal it all in, I applied several coats of General Finishes Top Coat in Flat Out Flat which was also a new product to me. I've used their Satin Top Coat for most of my products that I've done over the past two years. I didn't want a glossy finish for this piece, but I love that this still has a bit of a subtle sheen.
And here is the finished product! Isn't it cute? It doesn't look anything like the sad little desk that it once was and it's something that my little guy will have for quite a few years to come. I like to imagine him doing his homework, building Legos and hiding his treasures in the drawers.
I hope that you enjoyed my first project of 2017! I am looking forward to getting back into a more regular posting schedule once we move and things calm down a bit.
In the meantime, I hope that all my dear readers are well.
Until next time.
Monday, November 14, 2016
Refinished Table & Chairs Set
Before I married my husband, I was a divorced, single mother of modest means with two young kiddos. My apartment was mostly furnished with items that I had purchased from Ikea or a few beloved things that I had owned as a young girl. Now, there isn't anything wrong with Ikea and it's products. But, I think that we all know that they aren't meant to last a lifetime. When I moved into my husband's house, he had a few good pieces that were his but most of the furniture in his home left when his ex-wife did. We've limped along for the last five years trying to agree upon a furniture style that suits both our different tastes, but now we are finally putting our house up for sale and we need to fill the empty spots. Furnishing a house is an expensive undertaking, and while I have a much better job and an additional income with my husband, it's still a big financial investment. I have a vision for our future home, especially when it comes to our dining area. I want to have a formal area where we entertain which will tie in the dining set and china hutch that my husband's parents gifted him with and an everyday family dining area with my own set of painted furniture. Until then, my honey has agreed to take one for the team and put his formal furniture into storage until our dream home becomes a reality.
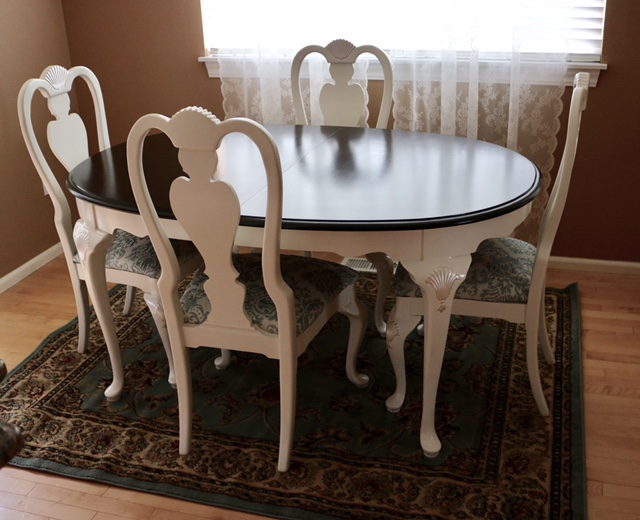
I very much enjoyed refinishing up the furniture that I upcycled and shared here on my blog back in 2014. The French Provincial style with it's elegantly curved lines and beautiful hardware suits both my vintage loving heart and my husband's more formal preference. Since the beginning of 2016, I have been slowly haunting my local Craigslist ads to find more vintage pieces to refurnish and bring into our home. In September, I stumbled across Facebook's marketplace for the first time (where have I been that I didn't know about this?). While scouring the furniture listings, I found a Queen Anne style table & chair set of my dreams with the most gorgeous details on the chairs and table legs. Real. Cherry. Wood. (#bestillmyheart) The best part was the low price tag. I had seen similar sets going for anywhere between $800-$1500 but I was able to snap up a table with 2 expandable leafs and 8 chairs for a mere $150.00. I had sold my very first piece of furniture two days prior for $85.00, so this set cost me $65 out of pocket. The gentleman that I purchased them from was super nice and even delivered them for free which I am grateful for as we only have a sedan at the moment. I have finished up the last little details and I thought that I would share with my readers how they turned out today.
Shortly after the Queen Anne set was dropped off, I went on to sell my husband's old table & chair set that his ex-wife left behind for $65 making this set essentially paid for except for the paint and supplies that I used. SCORE!! Here's what that set and old ugly carpet looked like:
Starting with the table, I sanded down the top just enough to rough up the surface topcoat to give the stain that I used something to grab onto. After washing the whole table down and letting it dry, I went to work with General Finishes Java Gel Stain which is my absolute favorite stain to work with. I've already redone several pieces in my home using this same product and fallen deep in love with the results. I've tried several ways to apply it from an old sock to an old rag and then onto a sponge applicator. What works best for me personally is to apply it first with the sponge applicator and then go over it with a small paint roller. This smooths out any lines and gives it a more even and professional appearance. As this is has more of a pudding like consistency and not watery like a traditional stain, this acts more like paint and covers up any wood grain detail in your piece. I actually prefer the dark and silky smooth texture that this product gives, but understand that it might not be the best stain for those who like to see the wood grain detailing in their furniture.
Once the gel stain was fully dry, I started applying General Finishes High Performance Top Coat. Another favorite product from this brand, I love this to seal in and protect my handiwork. As I intend to use this table as an everyday piece and I now have three children and one stepchild, I applied four coats of this product to help prevent against potential silverware damage and spills. This particular top coat has a glossy finish, which means any stains or stickiness left over from my 4-year-old's meals will easily come off with a damp cloth.
Next, I moved on to the apron and legs of the table. I don't normally like painting real wood pieces, so I didn't have much experience with cherry wood prior to this set. I did know that it does have a tendency to bleed though paint, and decided to start with a primer to see how that turned out. I used my trusty Zinsser's Bulls Eye Primer as it doesn't take long to dry. It did a pretty good job of covering up the cherry. I did notice a little bleeding in the area that I had had to sand down due to minor damage that had happened over the years from use. A quick spot touch up with more primer worked nicely and I was ready to start painting.
I had intended to use a milk paint from General Finishes for this entire piece but changed my mind at the last minute and went with the dark gel stain top and a latex paint instead. The paint I chose is Sherwin Williams 0053 Porcelain, a beautiful creamy white. It took me a while to decide on which white to buy, which seems a bit ridiculous because white is such a basic color. But I wanted a shade of white that was neither too ultra bright or too warm. Porcelain is a soft, pretty shade of white that has the perfect neutral undertone. Two coats was all it took on a Saturday afternoon and I left it to dry overnight.
I wanted to do something really special with the details on this set. I had initially thought about going the shabby chic route by sanding a bit over the details and the edges, I also considered using a dark glaze or wax and working it into all the details and corners but decided to go with Modern Masters Metallic Paint in Pearl. I've used their Oyster shade on a few other projects and loved the way that they had turned out at the end. Using a very fine tipped brush that was actually a concealer brush from Crown Brush in its former life, I hand detailed each fan on the four legs with several applications of the metallic paint as it's pretty sheer. Two layers of the same top coat and the table was complete.
To be frank, I was dreading the chairs. I knew that all eight chairs was going to be a lot of work. AND THEY WERE! I felt all 39 of my years for several days after a long weekend of endless hours of work on just four of them. I did the same process as the table with primer, paint and then metallic, following up with the top coat. These beauties not only had the same fan detail in the legs as the table, but another fan shape up at the top of the chair. Just beautiful! And I love how the metallic Pearl paint really accentuates their loveliness.
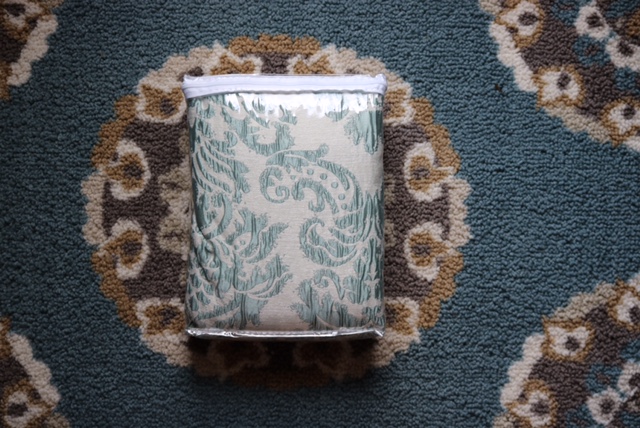
The original seat coverings were in rough shape. The gentleman that I purchased them from was in the middle of gutting his entire house and rebuilding it. There was all kinds of dust and stains all over this set which had not been covered up while he worked. I set about looking for the perfect material to recover the chairs with and actually found what I was looking for from Target. The material I chose has the same aqua blue color in it as a paint I have for another project that I will share on another day. I was excited to be able to find something so similar to tie both pieces together once I'm all done. But, can you tell that these were actually curtains once upon a time? That's right, I made seat covers out of curtains, hehe! I wanted a heavy material that would hold up for daily use and these curtains were nice and thick as they are designed to keep the light out. Target was having a sale on their home goods at the time and I was able to pick up several panels for only $19.99 each. To recover them, I just plunked my seat cushion down, cut the material to fit and held it super tight around the seat form while my husband used his staple gun to tack the material down in place.
I absolutely love my new set! There is something so satisfying in redoing something yourself and turning it into a piece that you will cherish for years to come.
And that brings me to the end of my first blog post and project since I relaunched delicatewhimsy. I hope that I may have inspired you to try your hand at recreating something you love into something you adore even more.
Until next time.
I very much enjoyed refinishing up the furniture that I upcycled and shared here on my blog back in 2014. The French Provincial style with it's elegantly curved lines and beautiful hardware suits both my vintage loving heart and my husband's more formal preference. Since the beginning of 2016, I have been slowly haunting my local Craigslist ads to find more vintage pieces to refurnish and bring into our home. In September, I stumbled across Facebook's marketplace for the first time (where have I been that I didn't know about this?). While scouring the furniture listings, I found a Queen Anne style table & chair set of my dreams with the most gorgeous details on the chairs and table legs. Real. Cherry. Wood. (#bestillmyheart) The best part was the low price tag. I had seen similar sets going for anywhere between $800-$1500 but I was able to snap up a table with 2 expandable leafs and 8 chairs for a mere $150.00. I had sold my very first piece of furniture two days prior for $85.00, so this set cost me $65 out of pocket. The gentleman that I purchased them from was super nice and even delivered them for free which I am grateful for as we only have a sedan at the moment. I have finished up the last little details and I thought that I would share with my readers how they turned out today.
Shortly after the Queen Anne set was dropped off, I went on to sell my husband's old table & chair set that his ex-wife left behind for $65 making this set essentially paid for except for the paint and supplies that I used. SCORE!! Here's what that set and old ugly carpet looked like:
Starting with the table, I sanded down the top just enough to rough up the surface topcoat to give the stain that I used something to grab onto. After washing the whole table down and letting it dry, I went to work with General Finishes Java Gel Stain which is my absolute favorite stain to work with. I've already redone several pieces in my home using this same product and fallen deep in love with the results. I've tried several ways to apply it from an old sock to an old rag and then onto a sponge applicator. What works best for me personally is to apply it first with the sponge applicator and then go over it with a small paint roller. This smooths out any lines and gives it a more even and professional appearance. As this is has more of a pudding like consistency and not watery like a traditional stain, this acts more like paint and covers up any wood grain detail in your piece. I actually prefer the dark and silky smooth texture that this product gives, but understand that it might not be the best stain for those who like to see the wood grain detailing in their furniture.
Once the gel stain was fully dry, I started applying General Finishes High Performance Top Coat. Another favorite product from this brand, I love this to seal in and protect my handiwork. As I intend to use this table as an everyday piece and I now have three children and one stepchild, I applied four coats of this product to help prevent against potential silverware damage and spills. This particular top coat has a glossy finish, which means any stains or stickiness left over from my 4-year-old's meals will easily come off with a damp cloth.
Next, I moved on to the apron and legs of the table. I don't normally like painting real wood pieces, so I didn't have much experience with cherry wood prior to this set. I did know that it does have a tendency to bleed though paint, and decided to start with a primer to see how that turned out. I used my trusty Zinsser's Bulls Eye Primer as it doesn't take long to dry. It did a pretty good job of covering up the cherry. I did notice a little bleeding in the area that I had had to sand down due to minor damage that had happened over the years from use. A quick spot touch up with more primer worked nicely and I was ready to start painting.
I had intended to use a milk paint from General Finishes for this entire piece but changed my mind at the last minute and went with the dark gel stain top and a latex paint instead. The paint I chose is Sherwin Williams 0053 Porcelain, a beautiful creamy white. It took me a while to decide on which white to buy, which seems a bit ridiculous because white is such a basic color. But I wanted a shade of white that was neither too ultra bright or too warm. Porcelain is a soft, pretty shade of white that has the perfect neutral undertone. Two coats was all it took on a Saturday afternoon and I left it to dry overnight.
I wanted to do something really special with the details on this set. I had initially thought about going the shabby chic route by sanding a bit over the details and the edges, I also considered using a dark glaze or wax and working it into all the details and corners but decided to go with Modern Masters Metallic Paint in Pearl. I've used their Oyster shade on a few other projects and loved the way that they had turned out at the end. Using a very fine tipped brush that was actually a concealer brush from Crown Brush in its former life, I hand detailed each fan on the four legs with several applications of the metallic paint as it's pretty sheer. Two layers of the same top coat and the table was complete.
To be frank, I was dreading the chairs. I knew that all eight chairs was going to be a lot of work. AND THEY WERE! I felt all 39 of my years for several days after a long weekend of endless hours of work on just four of them. I did the same process as the table with primer, paint and then metallic, following up with the top coat. These beauties not only had the same fan detail in the legs as the table, but another fan shape up at the top of the chair. Just beautiful! And I love how the metallic Pearl paint really accentuates their loveliness.
The original seat coverings were in rough shape. The gentleman that I purchased them from was in the middle of gutting his entire house and rebuilding it. There was all kinds of dust and stains all over this set which had not been covered up while he worked. I set about looking for the perfect material to recover the chairs with and actually found what I was looking for from Target. The material I chose has the same aqua blue color in it as a paint I have for another project that I will share on another day. I was excited to be able to find something so similar to tie both pieces together once I'm all done. But, can you tell that these were actually curtains once upon a time? That's right, I made seat covers out of curtains, hehe! I wanted a heavy material that would hold up for daily use and these curtains were nice and thick as they are designed to keep the light out. Target was having a sale on their home goods at the time and I was able to pick up several panels for only $19.99 each. To recover them, I just plunked my seat cushion down, cut the material to fit and held it super tight around the seat form while my husband used his staple gun to tack the material down in place.
I absolutely love my new set! There is something so satisfying in redoing something yourself and turning it into a piece that you will cherish for years to come.
And that brings me to the end of my first blog post and project since I relaunched delicatewhimsy. I hope that I may have inspired you to try your hand at recreating something you love into something you adore even more.
Until next time.
Subscribe to:
Posts (Atom)